Why The Aircraft Should Be in a Clean Configuration Before Engaging the Autopilot

ryanair takeoff

I was recently using a friend’s simulator and suggested that he fly the first leg. He decided to not select LNAV and VNAV before takeoff; he wanted to manage vertical and lateral roll himself, however, did select the autothrottle.  He was keen to begin (fly), and although he was using the FMC, he did not set the correct takeoff trim for the aircraft's weight.  Instead, he guessed the takeoff trim (based on previous flights). 

I was surprised when my friend engaged the autopilot and Level Change very soon after takeoff, with flaps 5 and the landing gear extended, and then was more surprised when he raised the flaps at the incorrect speeds.  The combination of a number of factors: incorrect takeoff trim, an almost immediate selection of the autopilot and Level Change, failing to retract the landing gear, and not adhering to the correct flap manoeuvring speed resulted in excessive attitude during the initial takeoff and climb.  This in turn resulted in a slow airspeed, a low altitude call out, and an increase in thrust followed by the vibration of the stick shaker. 

In this article, I will explain why engaging the autopilot before the aircraft is in a clean configuration is generally not recommended. I will also outline three key reference indicators that help determine the appropriate timing for flap retraction, and I will highlight the differences in flap retraction proceedures during a VNAV and Level Change takeoff during a standard flaps 5 takeoff.  Finally, I will offer practical recommendations to support a smooth and seamless transition from manual flying to automated flight.

Autopilot Use after Takeoff

Pilots very rarely use the autopilot during the initial climb out, preferring to hand fly the aircraft to flaps UP, and in some cases transition altitude, before engaging the autopilot.  This said, if a Standard Instrument Departure (SID) is complicated and requires several turns, then a pilot may select the autopilot at an earlier time, but typically this will not be before flaps UP, and if it is, the aircraft will be in correct trim prior to engaging the autopilot.

The autopilot is not engaged immediately after takeoff primarily because the aircraft, with flaps and landing gear extended, is not in a clean configuration and is still travelling at a relatively slow airspeed (takeoff thrust).  Engaging the autopilot too early may result in unpredictable behaviour, for example, attitude or speed anomalies, as my friend experienced.  More critically, if the autopilot were to fail at such a low altitude, there may be insufficient time or altitude to recover the aircraft safely..

Furthermore, engaging the autopilot before the flaps are fully retracted will cancel any speed bugs on the Primary Flight Display (PFD) that are tied to flap retraction.  This means that the flight crew will need to manually manage the airspeed at which the flaps are retracted; thereby increasing workload.

Attitude and Speed Settings - What Happens

When the autopilot is engaged, it primarily controls the aircraft based on attitude. Attitude refers to the aircraft’s orientation relative to the horizon, including pitch (nose up or down) and bank (left or right). The autopilot system uses sensors and flight control computers to maintain the desired attitude, ensuring a smooth and stable flight. This is done in conjunction with the Autothrottle.

If the autopilot is engaged with the flaps and landing gear extended, the autopilot may alter the aircraft's attitude to maintain the desired speed (V2+15/20 KIAS during takeoff); this is a dynamic response.   When the flaps are extended they increase lift and drag, causing the aircraft to pitch up and lose speed. The autothrottle will then increase thrust to maintain airspeed.  If not managed correctly, flaps and landing gear extension and retraction can cause a cycle of increasing and decreasing speed.

Trim Settings

Takeoff trim settings are important.  If the takeoff trim is incorrect for the aircraft’s weight, the corresponding V speeds provided by the FMC will not be correct.  An incorrectly trimmed aircraft can result in, amongst other things:

  1. An excessive use of the runway length during the takeoff roll;

  2. Over excessive control column angles;

  3. Incorrect airspeed; and,

  4. Excessive attitude.

All of the above, when combined, can lead to a snowball of problems, and even more so if the autopilot is engaged at a low altitude prior to the flaps and landing gear being retracted.  This is what my friend sourly experienced.

Important Points:

  • The transition from hand flying to automated flight will be straightforward and relatively seamless if the aircraft is in trim, the aircraft has adequate airspeed, and the flaps and landing gear are retracted. 

  • Whenever hand flying the aircraft, the trim should be set so that there is minimal back pressure required on the yoke (Do not trim the aircraft during rotation).

Retraction of Flaps (Visual Aids)

Flap retraction on the Boeing 737 often begins at V2+15/20 KIAS.  V2 represents the takeoff safety speed, while adding 15 to 20 KIAS provides a safe margin above stall speed as the aircraft accelerates during the climb.

Retraction should not occur before the aircraft has reached V2+15/+20 KIAS.  Typically, this is when the aircraft reaches Acceleration Height.  This stated, the minimum altitude that flaps can be retracted is 400 feet AGL.   If the aircraft’s airspeed is below V2+15/20 KIAS, flap retraction should not occur and the bank angle should be limited to 15 degrees.  If the aircraft’s airspeed is at or above V2+15/20 KIAS, and the speed is increasing, the first flap retraction can occur.

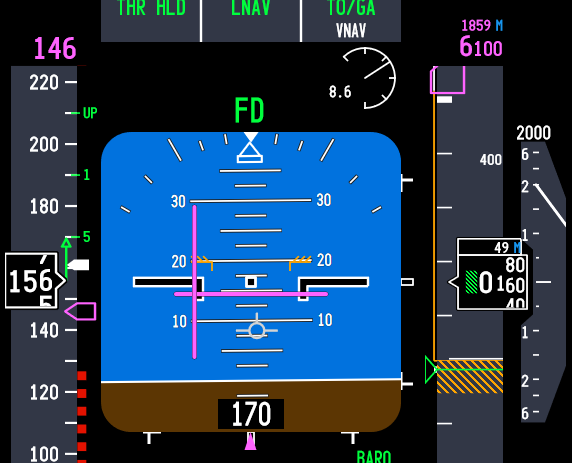
There are three visual aids, located on speed tape on the Primary Flight Display (PFD), that can be used to help determine the correct time to retract the flaps:

  • The Flap Manoeuvring Speed bug;

  • The Speed Trend Vector arrow; and,

  • The V2+15 KIAS white carrot bug.

Flap Manoeuvring Speed Bug

The Flap Manoeuvring Speed bug is a green-coloured line. The bug indicates when to retract the current flaps detente.  For example, when the aircraft's airspeed matches or passes through the flaps 5 designation you would select flaps 5 to flaps 1.  Then, when the airspeed passes through the flaps 1 position you would select flaps 1 to flaps UP.

Another way to think of the flap manoeuvring speed is it is the minimum airspeed that the flaps can be retracted.

Speed Trend Vector Arrow (STV)

Located on the speed tape on the PFD is a vertical arrow called a Speed Trend Vector (STV).  The Speed Trend Vector will display a green-coloured upwards, neutral or downwards facing arrow. 

During climb-out, the Speed Trend Vector arrowhead can be used to determine how long it will take for the aircraft, at the current thrust setting and wind conditions, to reach the speed that the arrowhead is pointing at (usually around 10 seconds).  Therefore, when the upward arrowhead reaches the flap manoeuvring speed bug, the aircraft will pass through this flaps détente in approximately 10 seconds.

The Speed Trend Vector also aids in determining if the speed of the aircraft is increasing, is stable, or is decreasing. This is important, as initial flap retraction should only occur when the speed of the aircraft is increasing. If the STV displays a stable or negative facing arrow, the initial retraction of flaps should be delayed.

Importantly, the Speed Trend Vector is 'live', meaning that the computer takes into account the aircraft's airspeed, vertical speed, and wind direction prior to displaying the vector on the PFD.  The Speed Trend Vector is also a useful tool during descent and on approach, when managing airspeed is critical.

White Carrot Indicator Bug

Located on the speed tape on the PFD is a white-coloured marker called a carrot (the carrot looks more like a sideways facing arrow).  The position of the carrot indicates V2+15 or V2+20 KIAS (the + speed is determined by the engine type and can be set to +15 or +20 in the ProSim IOS).

The carrot is a visual aid to indicate when the aircraft's airspeed has reached V2+15 KIAS.  This is the minimum speed at which the flaps can start to be retracted. 

The carrot is automatically removed from the display after the first flap retraction has occurred.

Flap Retraction - VNAV and Level Change Takeoff (V2+15)

VNAV Takeoff

  • At 400 ft AGL, VNAV becomes active.

  • At Acceleration Height (1000–1500 ft AGL), VNAV commands a pitch reduction to accelerate.

  • Flap retraction begins at V2+15 and continues as each flap manoeuvre speed is reached.

  • The autopilot can be engaged after 400 ft AGL for smoother transitions.

Level Change (LVL CHG) Takeoff

  • Used when VNAV is not armed or not preferred.

  • At Acceleration Height, the pilot selects flaps up speed in the MCP and engages LVL CHG.

  • Aircraft pitches to maintain that speed, allowing flap retraction as each flap manoeuvring speed is reached.

  • Autopilot is selected when flaps are fully retracted (discretion of pilot in command).

The key consideration is that a Level Change takeoff requires more manual monitoring of airspeed and pitch, in contrast to a VNAV takeoff which is smoother for flap retraction.

Flap Retraction Example (V2+15)

During a standard flaps 5 takeoff the following flaps retraction schedule should be followed:

When the airspeed reaches V2+15 or above or matches the Flap Manoeuvring Speed bug, and the Speed Trend Vector shows a positive arrow display, the first flaps retraction can occur (flaps 5 to flaps 1). When the airspeed matches the position of flaps 1, the flaps can be retracted to the UP position.

IMPORTANT POINT:

  • Be aware that the flaps do not retract instantly; depending upon the flap detente, the time it takes for the flaps to retract can be a few seconds. This should be taken into consideration, especially during a higher flap takeoff such as a flaps 25 takeoff.

Recommendations (Transition From Hand Flying To Automated Flight)

The transition from hand flying the aircraft to automated flight should be as seamless as possible.  To reduce the likelihood of unwanted or unexpected deviations from the desired flight path (for example, excessive attitude and/or an increase or decrease in thrust):

  1. The takeoff trim should be correct for the aircraft’s weight;

  2. The aircraft must have adequate airspeed;

  3. The flaps should be retracted as per the flap manoeuvring speed;

  4. The autopilot should not be engaged below 400 feet AGL;

  5. The autopilot should not be engaged before flap retraction is complete (1), and,

  6. The autopilot should be engaged only when the aircraft is in trim (neutral stick).

If these recommendations are followed, the transition from manual to automated flight will be barely discernible.

(1)  Technically speaking, the 737-800 can have the autopilot engaged before flaps retraction, however, best practice is to engage the autopilot after the flaps have been retracted.  Many operators stress that the flaps must be retracted prior to engaging the autopilot.  This said, ultimately it is at the discretion of the pilot in command.

Important Points:

  • The minimum altitude for initial flap retraction is 400 feet AGL, but most flight crews will begin to retract flaps at V2+15/20 KIAS or when the aircraft reaches Acceleration Height.

  • Flap retraction should be initiated upon reaching the manoeuvring speed for the current flap setting with the aircraft's airspeed increasing, unless the airspeed is above V2+15/20 KIAS and increasing; whereby, the first flap retraction can occur.

  • The white carrot is a handy reference to V2+15/+20 KIAS.

Autothrottle Disconnect Before Autopilot Disconnect

I also want to mention one further caveat when transitioning from automated to manual flight, and this involves the disconnection of the autopilot and autothrottle - not so much during a takeoff but at other stages during the flight.

Whenever hand flying the aircraft, the autopilot and autothrottle must not be engaged, but which do you disengage first - autopilot or autothrottle. Best practice is to always disconnect the autothrottle before the autopilot. The reason being is that the aircraft ‘s autothrottle system will respond more quickly than the autopilot (the last thing you need is for the autothrottle to spool after disconnecting the autopilot). Furthermore, do not disconnect both in rapid fire - take your time and wait a second between disconnecting the autothrottle followed by the autopilot. This enables a more seamless transition to occur.

Additional Information:

Final Call

My friend had an intense few minutes as the automated system attempted to fly the parameters that had been entered into the FMC and establish flight conditions based on the aircraft's configuration - a task made more difficult by the fact that the stick shaker was active and the altitude was below 600 feet.

Although this occurred in a simulator, it underscores an important lesson: preparation is key to a successful flight. There must be a clear plan for when specific actions will take place, and shortcuts must be avoided. Had my friend set the correct takeoff trim based on the aircraft's weight and refrained from engaging the autopilot while the aircraft was still in an unclean configuration at a low airspeed, the stick shaker probably would not have been triggered, and the flight could have been recovered. Unfortunately, with such low altitude, there was no margin for error - and the result was a simulator reset.

Video

The video shows the various displays discussed. The take off was a VNAV takeoff and the autopilot was engaged immediately after the flaps were fully retracted.


Primary Flight Display showing various takeoff guides discussed in main article


Flap retraction (courtesy U-Tube). This is not from flaps-2-approach


Image Gallery

Acronyms

AGL - Above Ground Level

Attitude - The orientation of the aircraft relative to the horizon, typically described in terms of pitch (nose up/down), roll (bank left/right), and yaw (nose left/right).

KIAS - knots indicated airspeed. 

737 Derates and the Boeing Quiet Climb System

A derate occurs when the engine's power is reduced to less than its full capacity.

Derates are not complicated; however, when they are discussed together, the subject matter can quickly become convoluted; mainly because the names for the differing derates are similar. I have attempted to try and keep things as simple as possible.

For those interested in simulating real world proceedures, an understanding of derates is essential.

This topic was previously part of a broader article. To improve readability and update the content, it has been separated from the original.

In this article, we will explore the following:

  • Derated Takeoff Thrust (fixed derate);

  • Assumed Temperature Method (ATM);

  • Derated Climb Thrust (CLB-1 & CLB-2); and,

  • The Quiet Climb System (often called cutback).

Reduced Thrust Derates (General Information)

Derates are not complicated; however, when they are discussed together, the subject matter can quickly become confusing; mainly because the names for the differing derates are similar. I have attempted to try and keep things as simple as possible.

Engine derates on a Boeing 737 refer to the intentional reduction in engine thrust during certain flight conditions to optimise engine performance, and increase the longevity of the engines. A derate involves limiting the maximum available thrust that an engine can produce under specific conditions.

Typically, the takeoff performance available from an aircraft is in excess of that required, even when accounting for an engine failure. As a result, airline management encourage flight crews to use a derate, when possible.

Purpose of Engine Derates:

  1. Safety and Engine Longevity: Derating can help prevent engine stress and prolong the life of the engine, especially during takeoff and climb phases.

  2. Performance Optimisation: It can help maintain more efficient fuel burn, manage high temperatures, and reduce engine wear.

  3. Environmental Conditions: In cases of high ambient temperature or high altitude airports, derating helps reduce the engine's demand on performance.

Derates can be assessed on the N1 Limit Page in the CDU. The following derates, applied singly or in combination, are possible:

  • Derated Takeoff Thrust (fixed derate).

  • Assumed Temperature Method (ATM) ; and,

  • Derated Climb Thrust (CLB-1 & CLB-2).

When To Use a Derate

Possible reasons for using or not using a derate are:

  • Environmental considerations (runway condition, weather, wind, etc);

  • Ambient temperature;

  • Airport’s height above sea level;

  • The weight of the aircraft’s load including fuel;

  • Consideration to airline management;

  • The length of the runway; and,

  • Noise abatement.

Electronic Flight Bag (EFB) or Takeoff Performance Tables

A derate is not selected idly by the flight crew. Most airlines use an Electronic Flight Bag (EFB) or another approved source to calculate a suitable derate. If an EFB is unavailable, the aircraft performance data tables in the Flight Crew Operating Manual (FCOM) must be consulted, and the calculations done manually.

Using a derate is not always an option in all situations. For example, in high-performance scenarios, such as heavy takeoffs, high density altitudes, or congested airspace, full thrust may be required. Similarly, a derate may not be suitable if the weather is extremely hot, or if the aircraft is heavy and the runway is short. The final decision on whether to use a derate rests with the Captain of the aircraft.

Thrust Mode Annunciations and Displays

When a derate is used, the thrust mode annunciation (the annunciation is displayed in green-coloured capitals) will be displayed in the Upper Display Unit on the EICAS. The display will differ depending on the airline option.

Possible displays are as follows:

  • TO – takeoff (displayed if no derate is used) - option without derate.

  • TO 1 – derated takeoff 1 - option without double derate.

  • TO 2 – derated takeoff 2 - option without double derate.

  • D-TO – assumed temperature reduced thrust takeoff (ATM) - option with double derate.

  • D-TO 1 – derate one and assumed temperature reduced thrust takeoff (ATM) - option with double derate.

  • D-TO 2 – derate two and assumed temperature reduced thrust takeoff (ATM) - option with double derate.

  • CLB-1 – climb derate.

  • CLB-2 – climb derate.

We will now examine the derates available in the Boeing 737 aircraft.

1 - Derated Takeoff Thrust (Fixed Derate)

A fixed derate is a certified takeoff rating lower than a full rated takeoff thrust. In order to use a fixed derate, takeoff performance data for a specified fixed derate is required (Boeing FCTM 2023). This information is available either from the EFB or from the aircraft performance data tables in the FCOM.

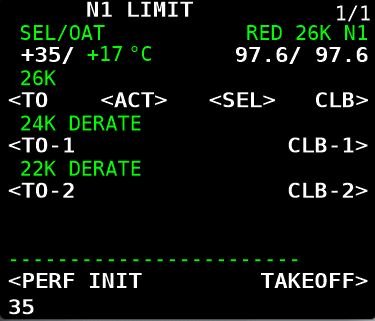
The N1 Limit page in the CDU displays three fixed-rate engine derates: 26000, 24000 and 22000 (26K, 24K and 22K). Selection of a derate will command the software to limit the maximum thrust of the engines to whatever has been selected; nothing is altered on the actual engine. Selecting a derated engine thrust can only occur when the aircraft is on the ground.

Once a fixed derate is selected, it will remain in force until the aircraft reaches acceleration height or a pitch mode is engaged, at which point the fixed derate will be removed.

The N1 for the selected derate is displayed on the NI Limit page, the TAKEOFF REF page (LSK-2L) and in the N1 RPM indication in the Upper Display Unit (%N1 RPM readout and N1 reference bug) on the EICAS.

Thrust Limitation (Fixed Derate)

When using a fixed derate, the takeoff thrust setting is considered a takeoff operating limit. This is because the minimum control speeds (Vmcg and Vmca) and stabiliser trim settings are based on the derated takeoff thrust.

The thrust levers should not be advanced beyond the N1 RPM indication unless takeoff conditions require additional thrust on both engines (e.g., during windshear). If the thrust levers are advanced beyond the N1 RPM indication—such as in the event of an engine failure during takeoff—any increase in thrust could lead to a loss of directional control.

Important Point:

  • A fixed derate can be used on a runway that is either wet, has standing water, or has slush, ice or snow ( provided the performance data supports use of such a derate).

2 - Assumed Temperature Method (ATM)

The assumed temperature method is not exactly a derate; however, it has been discussed because the use of ATM can reduce takeoff thrust.

This method calculates thrust based on a assumed higher than actual air temperature and requires the crew to input into the CDU a higher than actual outside temperature.  This will cause the on-board computer to believe that the temperature is warmer than what it actually is; thereby, reducing N1 thrust. This reduces the need for full thrust, achieving a quieter and more fuel-efficient takeoff.

Using ATM, the desired thrust can be be incrementally adjusted by changing the temperature to a higher or lower value. This can be an advantage to a flight crew as they can fine tune the thrust setting to exactly what is required, rather than using a fixed derate.

ATM is effective only above a certain standard temperature. The 737 Next Generation engines are flat-rated to a specific temperature. In the case of the CFM-56, this is ISA +15°C or 30°C on a standard day. This means the engine can provide full thrust up to that temperature. However, if the temperature exceeds this limit, the engine will produce less thrust. When ATM is used, the temperature must always be set higher than the engine’s flat-rated temperature. Otherwise, the engine will continue to provide full thrust.

Once ATM is selected, it will remain in force until the aircraft reaches acceleration height or a pitch mode is engaged, at which point ATM will be removed.

The desired thrust level is obtained through entry of a SEL TEMP value on the N1 Limit Page (LSK-1L) or from the Takeoff Ref Page 2/2 (LSK-4L).

To delete an assumed temperate the delete key in the CDU should be used.

Thrust Limitation (ATM)

An ATM is not the same as a true derate, even though the takeoff thrust is reduced. This is because when using ATM, the takeoff thrust setting is not considered a takeoff operating limit, since minimum control speeds (Vmcg and Vmca) are based on a full rated takeoff thrust.

At any time during takeoff using ATM, the thrust levers may be advanced to the full rated takeoff thrust (Boeing, 2023 FCTM; 3.17).

Important Points:

  • ATM may be used for takeoff on a wet runway, provided the takeoff performance data (for a wet runway) is used. However, ATM is not permitted for takeoff on a runway contaminated with standing water, slush, snow, or ice.

  • During an ATM takeoff, the yoke may require additional back pressure during rotation and climb.

  • If another derate is selected in combination with ATM, the calculation for takeoff thrust is accumulative. Selecting more than one derate can affect the power that is available for takeoff and significantly increase roll out distance for takeoff.

ATM Annunciations and Displays

When ATM is used, the temperature used to calculate the required thrust and the calculated N1 will be displayed:

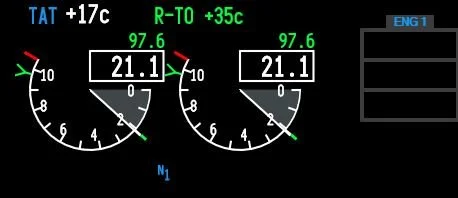
  • In the Thrust Mode Display in the Upper Display Unit on the EICAS (e.g., R-TO +35); and

  • On the N1 Limit page and the TAKEOFF REF page (LSK-1L & LSK-1R) in the CDU.

3. Combined Derate (Fixed Derate & ATM)

A fixed derate can be further reduced by combining it with the ATM. However, the combined derate must not exceed a 25% reduction from the takeoff thrust.

Thrust Limitation (Fixed Derate & ATM Combined)

When conducting a combined fixed derate and ATM takeoff, takeoff speeds consider Vmcg and Vmca only at the fixed derate thrust level.

The thrust levers should not be advanced beyond the fixed derate limit unless conditions during takeoff require additional thrust on both engines, such as in the case of windshear (Boeing, 2023 FCTM; 3.18).

If the assumed temperature method is applied to a fixed derate, additional thrust should not exceed the fixed derate N1 limit. Otherwise, there may be a loss of directional control while on the ground.

4 - Climb Derate (Derated Climb Thrust - CLB-1 & CLB-2) 

There are two climb mode derate annunciations: CLB-1 and CLB-2. CLB refers to normal climb thrust. To enter a climb derate, the N1 Limit page is opened in the CDU. The possible annunciations are as follows:

  • CLB: Normal climb thrust (no derate);

  • CLB-1: Approximately a 10% derate of climb thrust (climb limit reduced by approximately 3% N1; and,

  • CLB-2: Approximately a 20% derate of climb thrust (climb limit reduced by approximately 6% N1).

The use of a climb derate commands the autothrottle to reduce N1 to the setting calculated by the computer for either CLB-1 or CLB-2. The climb derate begins when the aircraft reaches the thrust reduction height (TRH) or during any climb phase up to FL150.

A climb derate can be selected either on the ground or while the aircraft is airborne; however, if during the climb, the vertical speed falls to below 500 feet per minute, the flight crew should manually select the next higher climb rating (for example, change from CLB-2 to CLB-1). As the aircraft climbs, the climb thrust is gradually reduced until full thrust is restored.

It is a common misconception that using a climb derate will minimise the volume of fuel used; however, this is incorrect.

The use of climb thrust does not save fuel; in fact, it consumes more fuel than full-rated takeoff thrust. However, using a lower climb thrust extends engine life and minimises maintenance. Ultimately, the extended engine life and reduced maintenance costs outweigh the additional fuel expense.

To remove a climb derate, either select CLB on the N1 Limit page or use the delete key on the CDU. The latter method is preferred because it deletes the selected climb derate rather than simply unselecting it.

Climb Derate Annunciations and Displays

When a climb derate is used, the derate selected and the corresponding N1 will be displayed:

  1. In the Thrust Mode Display on the Upper Display Unit on the EICAS (the annunciation is displayed in green-coloured capitals);

  2. On the NI Limit page and on the TAKEOFF REF page (LSK-2L) in the CDU;

  3. On the N1 RPM indicator; and,

  4. By the N1 reference bug.

After takeoff, the climb derate will also be displayed on the Climb page in the CDU.

The possible annunciations that can be displayed in the the thrust mode display are:

  1. TO (takeoff without a derate); and,

  2. R-TO (reduced takeoff thrust CLB-1 or CLB-2).

After takeoff, and when the thrust reduction height has been reached, the display will change to whatever climb derate was selected (CLB, CLB-1 or CLB-2).

Important Caveat (all derates):

It is important to note in relation to any derate that the FMC will automatically calculate a corresponding climb speed that is less than or equal to the takeoff thrust. Therefore, a flight crew should ensure that the climb thrust does not exceed the takeoff thrust.

This may occur if a derate or combination thereof is selected, and after takeoff, the flight crew select CLB. Selecting CLB will apply full climb thrust; however, this does not account for any adjustments made by the computer to the initially selected derate. As a result, the climb thrust may be greater than the takeoff thrust.

Boeing Quiet Climb System (QCS) - Abiding with Noise Abatement Protocols

The Boeing Quiet Climb System (often called cutback and referred to by line pilots as ‘hush mode’), is an automated avionics feature for quiet procedures that causes thrust cutback after takeoff.  By reducing and restoring thrust automatically, the system lessens crew workload and results in a consistently less noisy engine footprint, which helps airlines comply with noise abatement restrictions. There are two variables to enter: Altitude reduction and altitude restoration.

During the takeoff checklist procedure, the pilot selects the QCS and enters the height AGL at which thrust should be reduced.  This height should not be less than the thrust reduction height. The thrust restored height is typically 3000 feet AGL, however, the height selected may alter depending on obstacle clearance and the noise abatement required. 

With the autothrottle system engaged, the QCS reduces engine thrust when the cutback height is reached to maintain the optimal climb angle and airspeed. When the airplane reaches the chosen thrust restoration height (typically 3,000 ft AGL or as indicated by noise abatement procedures), the QCS restores full climb thrust.  Note that the minimum height that the QCS can be set is 800 feet AGL. 

The two heights referenced by the Quiet Climb System can be modified in the CDU (TAKEOFF REF 2/2 page (LSK-5R)). The system can be selected or unselected at LSK-6L (on/off).

Important Point:

  • The QCS is not designed to be used with multiple derates (derate + ATM); however, it can be used in conjunction with one or the other. This said, the minimum thrust cutback (thrust reduction height ~800 feet AGL) represents the minimum level of thrust that would ensure a sufficient climb gradient if an engine were to fail. The minimum thrust cutback ensures an engine-inoperative climb gradient of 1.2 percent. If one engine fails after cutback, the thrust from the operating engine must maintain a climb gradient of at least 1.2 percent.

Multiple Safety Features for Disconnect

The Quiet Climb System (QCS) incorporates multiple safety features and will continue to operate even in the event of system failures. If a failure occurs, the QCS can be exited by either:

  1. Selecting the takeoff/go-around (TOGA) switches on the throttle control levers, or

  2. Disconnecting the autothrottle and controlling thrust manually.

ProSim737

The Quiet Climb System was previously a component of the ProSim737 avionics suite; however, it was removed with the release of version 3.33. It is now available only in the professional version of ProSim737, not in the domestic version.

As a result, if a takeoff requires noise abatement, the necessary calculations and settings must be performed manually. This process is not difficult, as a fixed derate, ATM, or a combination thereof, along with the acceleration height, can be entered or adjusted based on the requirements of either an NADP 1 or NADP 2 procedure.

Figure 2: For completeness, and to provide an example of the altitude above ground level (AGL) that a noise abatement procedure uses.

Figure 2: Noise Abatement Departure Procedures (NADP). (click image for larger view).

Similarity of Terms

When you look at the intricacies of the above mentioned derates there is a degree of similarity.

The way I remember them is as follows:

Derated Takeoff Thrust is when the N1 of the engines is reduced (26K, 24K or 22K). This is done prior to takeoff;

Assumed Temperature Method (ATM) is when the N1 is lowered by changing the ambient temperature to a higher value in the CDU. This is done prior to takeoff;

Climb Derate (Derated Climb Thrust - CLB-1 & CLB-2) is when the N1 used during the climb phase is set to a lower power setting. Selecting a climb derate can be done either prior to takeoff or when the aircraft is airborne; and,

The Quiet Climb System enables a minimum and maximum height to be set in the CDU; thereby, reducing engine power and engine noise.  The restoration height is the height AGL that full climb power is restored.  The QCS is used only for noise abatement.

Final Call

Acceleration height, thrust reduction height, and derates are critical elements in optimising the takeoff performance of the Boeing 737.

Acceleration height is the altitude at which the aircraft’s nose is lowered to gain speed and the flaps are retracted, while the thrust reduction height determines at what height above ground level (AGL) to reduce engine power, from takeoff thrust to a lower setting. By adjusting the engine thrust settings and applying derates, operators can enhance engine longevity, improve fuel efficiency, and reduce noise during takeoff.

Understanding and properly applying these settings not only ensures compliance with performance regulations, but also contributes to operational efficiency. Ultimately, these parameters enable operators to maximise safety, minimise fuel consumption, and optimise aircraft performance during takeoff.

Acronyms Used

  • AGL – Above Ground Level

  • CDU – Control Display Unit

  • CLB-1 & CLB-2 – Climb 1 and Climb 2

  • DERATE – Derated Thrust

  • FL – Flight Level

  • FMC – Flight Management Computer

  • LSK-1R – Line Select 1 Right (CDU)

  • PFD - Primary Flight Display

  • QCS – Quiet Climb System

  • TMD – Thrust Mode Display

  • Vmca – Defined as the minimum speed, whilst in the air, that directional control can be maintained with one engine inoperative.

  • Vmcg – Defined as the minimum airspeed, during the takeoff at which, if an engine failure occurs, it is possible to maintain directional control using only aerodynamic controls. Vmcg must not be greater than V1.

Gallery: Various screen grabs from the CDU showing the effect on %N1 for various fixed derates and Assumed temperate (ATM). 

Acceleration Height and Thrust Reduction Height

Thompson B738NG transitioning to Thrust Reduction Height, Immediately following this will be acceleration height when the aircraft’s nose is lowered, flaps are retracted and climb thrust commences, acceleration will be reached, Manchester, UK (Craig Sunter from Manchester, UK, Boeing 737-800 (Thomson Airways) (5895152176), CC BY 2.0)

The takeoff phase of a flight is one of the busiest and most critical periods, and during this time, several distinct functions occur in rapid succession. While each function serves a unique purpose, they are intricately linked by the changing altitude of the aircraft.

Because they unfold so quickly, these functions often cause confusion for those unfamiliar with the process.

In this article, we will explore the following:

  • Acceleration Height; and,

  • Thrust Reduction Height.

Acceleration Height (AH)

Acceleration height is the altitude AGL that the aircraft transitions from the takeoff speed (V2 +15/20) to climb speed.  This altitude is typically between 1000 and 1500 feet, but may be as low as 800 feet; however, can differ due to noise abatement, airline policy, or airport specifics such as obstacles, etc.

The three main reasons for acceleration height are:

  1. It provides a safe height (AGL) at which the aircraft’s airspeed can be increased (transition to climb speed) and the flaps retracted;

  2. It enables a safety envelope below this altitude should there be an engine failure; engines are set to maximum thrust, and the aircraft’s attitude is set to maintain V2 safety speed (V2+15/20); and,

  3. It provides a noise buffer concerning noise abatement. Below acceleration height the engines will be targeting V2 safety speed (V2 +15/20) and will be generating less engine noise.

Acceleration height can be changed in the CDU: (Init/Ref Index/Takeoff Ref Page (LSK-4—L) ACCEL HT ---- AGL).

Practical Application

Takeoff Ref page showing acceleration height OF 1500 FEET agl and thrust reduction height (thr reduction) OF 800 FEET AGL. BOTH CAN BE CHANGED AS REQUIRED

Once acceleration height has been reached, the pilot flying will reduce the aircraft’s attitude by pushing the yoke forward; thereby, increasing the aircraft’s airspeed.  As the airspeed increases to climb speed, the flaps can be retracted as per the flaps retraction schedule. It is important not to retract the flaps until the aircraft is accelerating at the airspeed indicated by the flaps retraction schedule (flaps manoeuvring speed indicator) displayed on the speed tape in the Primary Flight Display).

Assuming an automated takeoff with VNAV and LNAV selected, and once acceleration height is reached, the autothrottle will be commanded by the autoflight system to increase the aircraft’s airspeed to climb speed. If manually flying the aircraft, the flight crew will need to increase the speed from V2 +15/20 to climb speed (by dialling a new speed into the MCP speed window).

Although crews use slightly varying techniques; I find the following holds true for a non-automation climb to 10,000 feet AGL:

  1. Set the MCP to V2;

  2. Fly the flight director cues to acceleration height (this will be at V2 +15/+20);

  3. At acceleration height, push yoke forward reducing the aircraft’s attitude (pitch);

  4. Dial into the MCP speed window the appropriate 'clean up' speed (reference the top white-coloured carrot on the speed tape of the PFD, typically 210-220 kias);

  5. As the forward airspeed increases, you will quickly pass through the schedule for initial flap retraction (as indicated by the green-coloured flaps manoeuvring speed indicator – retract flaps 5;

  6. Continue to retract the flaps as per the schedule; and,

  7. After the flaps are retracted, engage automation (if wanted) and increase airspeed to 250 kias or as indicated by Air Traffic Control.

Note:  If the acceleration height has been entered into the CDU, the flight director bars will command the decrease in pitch when the selected altitude has been reached - all you do is follow the flight director bars.

upper display unit (in eicas) showing Thrust reduction. the green-coloured N1 reference bug reads 89.8 N1 and takeoff thrust is being reduced to this figure from 97.8 N1

Thrust Reduction Height (TRH)

The main wear on engines, especially turbine engines, is heat. If you reduce heat, the engine will have greater longevity. This is why takeoff power is often time limited and the thrust reduced at and a height AGL. The difference between takeoff thrust and climb thrust may vary only be a few percent, but the lowering of EGT reduces heat and extends engine life significantly. 

The thrust reduction height is the height AGL where the transition from takeoff to climb thrust takes place.  Acceleration height comes soon after.

The height used for thrust reduction, not taking into account noise abatement, can vary and be dependent on airline policy. Typically it falls between 800-1500 feet AGL. 

Possible reasons for selecting a higher height AGL at which thrust reduction occurs may be obstacle clearance (such as buildings, towers, etc) or environmental factors.

When the aircraft reaches the thrust reduction height, the resultant loss of N1 is displayed on the N1 RPM indication in the Upper Display Unit of the EICAS. The N1 is displayed in large white numerals (87.7) and is also indicated by the green-coloured N1 reference bug.

Confusion between Acceleration Height and Thrust Reduction Height

Newcomers are often confused between the two similarly-sounding terms, possibly because they both occur at the interface between takeoff and climb-out.  Simply written:

  • Thrust Reduction Height is the height AGL at which the takeoff thrust will be reduced by a few percent N1. This is done to increase engine life and lower maintenance. It is also when the autothrottle will be commanded to decrease the takeoff thrust to climb thrust; and.

  • Acceleration Height is when the nose of the aircraft is lowered to increase airspeed. The flaps are then retracted as per the flaps retraction schedule.

    Both may occur simultaneously or at differing heights above ground level.  Both can be configured in the CDU.

To change the acceleration height: Init/Ref Index/Takeoff Ref Page 2/2 (LSL-4L).

To change the thrust reduction height: Init/Ref Index/Takeoff Ref Page 2/2 (LSL-5R).

Final Call

Acceleration height and thrust reduction height are critical elements in optimising the takeoff performance of the Boeing 737.

Acceleration height is the altitude at which the aircraft’s nose is lowered to gain airspeed and the flaps are retracted, while the thrust reduction height determines at what height above ground level (AGL) to reduce engine power, from full takeoff thrust to a few percent less N1. The lowering of N1 enhance engine longevity, improve fuel efficiency, and reduce noise during takeoff.

Note

This topic previously was part of another multi-faceted article. To improve readability it has been separated out from the original.

BELOW: Video showing thrust reduction height and acceleration height (ProSim737).


Takeoff (derate 24K CLB-1). Note drop in N1 thrust as aircraft reaches 800 feet AGL (throttle reduction height). At acceleration height (1500 feet AGL) the flight director commands a pitch down. As airspeed increases flaps are retracted as per the schedule (ProSim737)