Why The Aircraft Should Be in a Clean Configuration Before Engaging the Autopilot
/ryanair takeoff
I was recently using a friend’s simulator and suggested that he fly the first leg. He decided to not select LNAV and VNAV before takeoff; he wanted to manage vertical and lateral roll himself, however, did select the autothrottle. He was keen to begin (fly), and although he was using the FMC, he did not set the correct takeoff trim for the aircraft's weight. Instead, he guessed the takeoff trim (based on previous flights).
I was surprised when my friend engaged the autopilot and Level Change very soon after takeoff, with flaps 5 and the landing gear extended, and then was more surprised when he raised the flaps at the incorrect speeds. The combination of a number of factors: incorrect takeoff trim, an almost immediate selection of the autopilot and Level Change, failing to retract the landing gear, and not adhering to the correct flap manoeuvring speed resulted in excessive attitude during the initial takeoff and climb. This in turn resulted in a slow airspeed, a low altitude call out, and an increase in thrust followed by the vibration of the stick shaker.
In this article, I will explain why engaging the autopilot before the aircraft is in a clean configuration is generally not recommended. I will also outline three key reference indicators that help determine the appropriate timing for flap retraction, and I will highlight the differences in flap retraction proceedures during a VNAV and Level Change takeoff during a standard flaps 5 takeoff. Finally, I will offer practical recommendations to support a smooth and seamless transition from manual flying to automated flight.
Autopilot Use after Takeoff
Pilots very rarely use the autopilot during the initial climb out, preferring to hand fly the aircraft to flaps UP, and in some cases transition altitude, before engaging the autopilot. This said, if a Standard Instrument Departure (SID) is complicated and requires several turns, then a pilot may select the autopilot at an earlier time, but typically this will not be before flaps UP, and if it is, the aircraft will be in correct trim prior to engaging the autopilot.
The autopilot is not engaged immediately after takeoff primarily because the aircraft, with flaps and landing gear extended, is not in a clean configuration and is still travelling at a relatively slow airspeed (takeoff thrust). Engaging the autopilot too early may result in unpredictable behaviour, for example, attitude or speed anomalies, as my friend experienced. More critically, if the autopilot were to fail at such a low altitude, there may be insufficient time or altitude to recover the aircraft safely..
Furthermore, engaging the autopilot before the flaps are fully retracted will cancel any speed bugs on the Primary Flight Display (PFD) that are tied to flap retraction. This means that the flight crew will need to manually manage the airspeed at which the flaps are retracted; thereby increasing workload.
Attitude and Speed Settings - What Happens
When the autopilot is engaged, it primarily controls the aircraft based on attitude. Attitude refers to the aircraft’s orientation relative to the horizon, including pitch (nose up or down) and bank (left or right). The autopilot system uses sensors and flight control computers to maintain the desired attitude, ensuring a smooth and stable flight. This is done in conjunction with the Autothrottle.
If the autopilot is engaged with the flaps and landing gear extended, the autopilot may alter the aircraft's attitude to maintain the desired speed (V2+15/20 KIAS during takeoff); this is a dynamic response. When the flaps are extended they increase lift and drag, causing the aircraft to pitch up and lose speed. The autothrottle will then increase thrust to maintain airspeed. If not managed correctly, flaps and landing gear extension and retraction can cause a cycle of increasing and decreasing speed.
Trim Settings
Takeoff trim settings are important. If the takeoff trim is incorrect for the aircraft’s weight, the corresponding V speeds provided by the FMC will not be correct. An incorrectly trimmed aircraft can result in, amongst other things:
An excessive use of the runway length during the takeoff roll;
Over excessive control column angles;
Incorrect airspeed; and,
Excessive attitude.
All of the above, when combined, can lead to a snowball of problems, and even more so if the autopilot is engaged at a low altitude prior to the flaps and landing gear being retracted. This is what my friend sourly experienced.
Important Points:
The transition from hand flying to automated flight will be straightforward and relatively seamless if the aircraft is in trim, the aircraft has adequate airspeed, and the flaps and landing gear are retracted.
Whenever hand flying the aircraft, the trim should be set so that there is minimal back pressure required on the yoke (Do not trim the aircraft during rotation).
Retraction of Flaps (Visual Aids)
Flap retraction on the Boeing 737 often begins at V2+15/20 KIAS. V2 represents the takeoff safety speed, while adding 15 to 20 KIAS provides a safe margin above stall speed as the aircraft accelerates during the climb.
Retraction should not occur before the aircraft has reached V2+15/+20 KIAS. Typically, this is when the aircraft reaches Acceleration Height. This stated, the minimum altitude that flaps can be retracted is 400 feet AGL. If the aircraft’s airspeed is below V2+15/20 KIAS, flap retraction should not occur and the bank angle should be limited to 15 degrees. If the aircraft’s airspeed is at or above V2+15/20 KIAS, and the speed is increasing, the first flap retraction can occur.
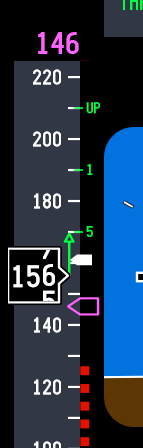
There are three visual aids, located on speed tape on the Primary Flight Display (PFD), that can be used to help determine the correct time to retract the flaps:
The Flap Manoeuvring Speed bug;
The Speed Trend Vector arrow; and,
The V2+15 KIAS white carrot bug.
Flap Manoeuvring Speed Bug
The Flap Manoeuvring Speed bug is a green-coloured line. The bug indicates when to retract the current flaps detente. For example, when the aircraft's airspeed matches or passes through the flaps 5 designation you would select flaps 5 to flaps 1. Then, when the airspeed passes through the flaps 1 position you would select flaps 1 to flaps UP.
Another way to think of the flap manoeuvring speed is it is the minimum airspeed that the flaps can be retracted.
Speed Trend Vector Arrow (STV)
Located on the speed tape on the PFD is a vertical arrow called a Speed Trend Vector (STV). The Speed Trend Vector will display a green-coloured upwards, neutral or downwards facing arrow.
During climb-out, the Speed Trend Vector arrowhead can be used to determine how long it will take for the aircraft, at the current thrust setting and wind conditions, to reach the speed that the arrowhead is pointing at (usually around 10 seconds). Therefore, when the upward arrowhead reaches the flap manoeuvring speed bug, the aircraft will pass through this flaps détente in approximately 10 seconds.
The Speed Trend Vector also aids in determining if the speed of the aircraft is increasing, is stable, or is decreasing. This is important, as initial flap retraction should only occur when the speed of the aircraft is increasing. If the STV displays a stable or negative facing arrow, the initial retraction of flaps should be delayed.
Importantly, the Speed Trend Vector is 'live', meaning that the computer takes into account the aircraft's airspeed, vertical speed, and wind direction prior to displaying the vector on the PFD. The Speed Trend Vector is also a useful tool during descent and on approach, when managing airspeed is critical.
White Carrot Indicator Bug
Located on the speed tape on the PFD is a white-coloured marker called a carrot (the carrot looks more like a sideways facing arrow). The position of the carrot indicates V2+15 or V2+20 KIAS (the + speed is determined by the engine type and can be set to +15 or +20 in the ProSim IOS).
The carrot is a visual aid to indicate when the aircraft's airspeed has reached V2+15 KIAS. This is the minimum speed at which the flaps can start to be retracted.
The carrot is automatically removed from the display after the first flap retraction has occurred.
Flap Retraction - VNAV and Level Change Takeoff (V2+15)
VNAV Takeoff
At 400 ft AGL, VNAV becomes active.
At Acceleration Height (1000–1500 ft AGL), VNAV commands a pitch reduction to accelerate.
Flap retraction begins at V2+15 and continues as each flap manoeuvre speed is reached.
The autopilot can be engaged after 400 ft AGL for smoother transitions.
Level Change (LVL CHG) Takeoff
Used when VNAV is not armed or not preferred.
At Acceleration Height, the pilot selects flaps up speed in the MCP and engages LVL CHG.
Aircraft pitches to maintain that speed, allowing flap retraction as each flap manoeuvring speed is reached.
Autopilot is selected when flaps are fully retracted (discretion of pilot in command).
The key consideration is that a Level Change takeoff requires more manual monitoring of airspeed and pitch, in contrast to a VNAV takeoff which is smoother for flap retraction.
Flap Retraction Example (V2+15)
During a standard flaps 5 takeoff the following flaps retraction schedule should be followed:
When the airspeed reaches V2+15 or above or matches the Flap Manoeuvring Speed bug, and the Speed Trend Vector shows a positive arrow display, the first flaps retraction can occur (flaps 5 to flaps 1). When the airspeed matches the position of flaps 1, the flaps can be retracted to the UP position.
IMPORTANT POINT:
Be aware that the flaps do not retract instantly; depending upon the flap detente, the time it takes for the flaps to retract can be a few seconds. This should be taken into consideration, especially during a higher flap takeoff such as a flaps 25 takeoff.
Recommendations (Transition From Hand Flying To Automated Flight)
The transition from hand flying the aircraft to automated flight should be as seamless as possible. To reduce the likelihood of unwanted or unexpected deviations from the desired flight path (for example, excessive attitude and/or an increase or decrease in thrust):
The takeoff trim should be correct for the aircraft’s weight;
The aircraft must have adequate airspeed;
The flaps should be retracted as per the flap manoeuvring speed;
The autopilot should not be engaged below 400 feet AGL;
The autopilot should not be engaged before flap retraction is complete (1), and,
The autopilot should be engaged only when the aircraft is in trim (neutral stick).
If these recommendations are followed, the transition from manual to automated flight will be barely discernible.
(1) Technically speaking, the 737-800 can have the autopilot engaged before flaps retraction, however, best practice is to engage the autopilot after the flaps have been retracted. Many operators stress that the flaps must be retracted prior to engaging the autopilot. This said, ultimately it is at the discretion of the pilot in command.
Important Points:
The minimum altitude for initial flap retraction is 400 feet AGL, but most flight crews will begin to retract flaps at V2+15/20 KIAS or when the aircraft reaches Acceleration Height.
Flap retraction should be initiated upon reaching the manoeuvring speed for the current flap setting with the aircraft's airspeed increasing, unless the airspeed is above V2+15/20 KIAS and increasing; whereby, the first flap retraction can occur.
The white carrot is a handy reference to V2+15/20 KIAS.
Autothrottle Disconnect Before Autopilot Disconnect
I also want to mention one further caveat when transitioning from automated to manual flight, and this involves the disconnection of the autopilot and autothrottle - not so much during a takeoff but at other stages during the flight.
Whenever hand flying the aircraft, the autopilot and autothrottle must not be engaged, but which do you disengage first - autopilot or autothrottle. Best practice is to always disconnect the autothrottle before the autopilot. The reason being is that the aircraft ‘s autothrottle system will respond more quickly than the autopilot (the last thing you need is for the autothrottle to spool after disconnecting the autopilot). Furthermore, do not disconnect both in rapid fire - take your time and wait a second between disconnecting the autothrottle followed by the autopilot. This enables a more seamless transition to occur.
Additional Information:
Final Call
My friend had an intense few minutes as the automated system attempted to fly the parameters that had been entered into the FMC and establish flight conditions based on the aircraft's configuration - a task made more difficult by the fact that the stick shaker was active and the altitude was below 600 feet.
Although this occurred in a simulator, it underscores an important lesson: preparation is key to a successful flight. There must be a clear plan for when specific actions will take place, and shortcuts must be avoided. Had my friend set the correct takeoff trim based on the aircraft's weight and refrained from engaging the autopilot while the aircraft was still in an unclean configuration at a low airspeed, the stick shaker probably would not have been triggered, and the flight could have been recovered. Unfortunately, with such low altitude, there was no margin for error - and the result was a simulator reset.
Video
The video shows the various displays discussed. The take off was a VNAV takeoff and the autopilot was engaged immediately after the flaps were fully retracted.
Image Gallery

Acronyms
AGL - Above Ground Level
Attitude - The orientation of the aircraft relative to the horizon, typically described in terms of pitch (nose up/down), roll (bank left/right), and yaw (nose left/right).
KIAS - knots indicated airspeed.