Starting Sequence and Batch File Use for ProSim737 Avionics Suite
/Splash screen - Prosim737 main module (startup sequence added)
Introduction
A full cockpit simulator that emulates Boeing 737 avionics is far more complex than a desktop flight simulator. A full cockpit simulator integrates multiple hardware components, a complete avionics suite, and several layers of ancillary software. Each component, whether responsible for flight controls, cockpit displays, or system logic must communicate reliably with the others to maintain a seamless and accurate simulation environment.
Because the system’s components are interdependent, the software must be started and shut down in a logical sequence to maintain stability, performance, and consistent behaviour. This is especially important when multiple applications are part of the same workflow, as each component may depend on specific services, configuration states, or background tasks being completed prior to initialisation.
This guide outlines the recommended startup sequence for the ProSim737 avionics suite. It also describes the key components involved and introduces batch files as a practical method for automating the process, ensuring that the flight simulator and its supporting software start and shut down in a controlled and predictable sequence.
Terminology Note: In this article, the terms run, launch and start are used interchangeably.
ProSim737 - Module Instances and Configuration
The ProSim737 avionics suite is designed to operate in both single and multi-computer environments. To support this flexibility, the platform allows a variety of system configurations, including running multiple instances of the same module simultaneously. The only exception is the ProSim737 main module, which must be installed on the server computer running Flight Simulator.
This capability allows individual modules to be tailored to specific functions, providing flexibility in how displays, audio, and other systems are configured. For example, a single display module can be started multiple times to serve different cockpit functions. Four instances can provide the Captain’s and First Officer’s Primary Flight Displays (PFD) and Navigation Displays (ND).
The same principle applies to the audio module. Multiple instances can run in parallel, enabling specific sounds, such as callouts, system alerts, or environmental audio, to be routed to different speakers throughout the simulator.
Typical ProSim737 Setup
A typical Flight Simulator setup will run one or more instances of the following ProSim software:
ProSim737 main module.
ProSim IOS (Instructor Operator Station).
ProSim Display module.
ProSim Audio module.
ProSim Hardware Connector.
ProSim CDU.
ProSim Overhead (main panel).
ProSim Chrono module (clock and timer).
More complex setups may involve both server and client computers, with multiple instances of the same components running across the network. To ensure proper communication between these modules, the ProSim737 main module must be running and active, as it manages all interactions within the ProSim737 avionics suite.
ProSim737 Module Startup and Communication Logic
The most important module in the ProSim737 family is the ProSim737 main module, which serves as the central controller and must be running and initialised before other modules can communicate.
When run, the ProSim737 main module will:
Scan the network for other ProSim modules;
Establish communication channels (typically via TCP/UDP);
Begin sending and receiving data packets; and
Activate the other modules, which ‘wake up’ once communication is established (if in standby mode).
If any other ProSim module is opened before the main module, it remains idle; it processes no flight data, performs no system initialisation, and generates no errors - until a connection with the main module is established. Therefore, running modules in standby mode does not harm the software or corrupt any files.
Although ProSim737 is robust and capable of connecting to its sister modules, starting modules in standby mode before the main module can sometimes cause issues. These may include the main module failing to connect to the server, or individual modules not receiving data or functioning correctly.
For this reason, it is recommended to start the ProSim737 main module first. Once it is running, the remaining modules can be opened to ensure a clean connection and a smooth startup process.
If the main module fails to connect, or if an individual module is not functioning correctly, simply close all ProSim modules and restart them. Flight Simulator and other supporting programs can remain running.
Important Point
ProSim737 modules can be started in any sequence. However, for the most logical, reliable, and consistent operation, it is recommended to start the main module first, allow it time to initialise, and then start the remaining modules.
When to Start Flight Simulator and ProSim737
For the ProSim737 avionics suite to operate correctly, it is important to follow a logical startup sequence. Begin by starting Flight Simulator, loading a flight, and positioning the aircraft on the runway with the wheel brakes applied to prevent unintended movement. Once Flight Simulator is running correctly, start the ProSim737 main module. After the main module has opened and the software has initialised, the remaining modules can be started.
Launching modules in the wrong sequence will not damage the software, but following a controlled startup sequence ensures each application has time to initialise, establishes clean inter‑module communication, reduces the risk of conflicts, and allows background services to stabilise before use.
Flight Simulator should be started first because ProSim737 relies on several layers of software hierarchy that must communicate with Flight Simulator before the main module can initialise successfully.
Ancillary Software
Although real‑world testing has shown no issues, it is good practice to start any additional software only after Flight Simulator and ProSim737 are running, unless the additional software’s own manual specifies a different startup sequence.
Active Sky
Active Sky (ASFS) is widely used by ProSim737 users because it provides realistic rainfall returns on the weather radar. Hi‑Fi recommends starting Active Sky before launching Flight Simulator so that the desired weather can be viewed and selected prior to loading a flight. However, this is not essential, Active Sky can also be started after Flight Simulator is already running.
Since the ProSim737 main module reads weather information during its startup sequence, it is best to have Active Sky running with the weather already selected (or live weather downloaded and displayed) before starting the main module.
Recommended Starting Sequence
After Flight Simulator and the ProSim737 main module have been started, there is no specific sequence that the remaining modules should be opened. The following is a suggestion:
Flight Simulator.
ProSim737 main module (wait until running and initialised).
ProSim Hardware Connector (if required).
ProSim Display module (Captain and First Officer-side PFD, ND and EICAS - any sequence).
ProSim Audio module (s).
ProSim Chrono module.
ProSim Overhead (main panel).
ProSim other components/displays (if required).
ProSim CDU.
Ancillary Programs.
Note: In this startup sequence, Active Sky (if used) may be started either after Flight Simulator but before starting the ProSim737 main module, or prior to starting Flight Simulator.
Closing ProSim737, Flight Simulator and Ancillary Programs
There is no officially defined shutdown protocol, and depending on your setup, it may be necessary to keep the ProSim737 main module running to use the IOS for closing client computers (For IOS to function, it must maintain a connection with the main module). The following shutdown sequence is therefore recommended:
Close ancillary programs.
Close all ProSim components and displays.
Close ProSim IOS.
Close ProSim737 main module.
Close Flight Simulator.
Batch File Use
Batch files provide an efficient way to automate repetitive tasks within a simulator environment. When configured correctly, they streamline the startup and shutdown of multiple applications, reduce operator workload, and ensure programs run in a controlled, predictable sequence.
This section offers an overview of batch file usage, key concepts, and common syntax relevant to ProSim737 and associated Flight Simulator software.
Function of Batch Files
A batch file is a simple script that executes a series of Windows commands automatically. In a simulation environment, batch files are particularly useful for:
Launching, closing, or terminating multiple programs in a defined sequence;
Managing timing between application launches;
Displaying status messages to the operator; and
Reducing manual input and the potential for error.
Batch files can range from very simple (one or two commands) to highly complex scripts containing logic, error handling and console display formatting.
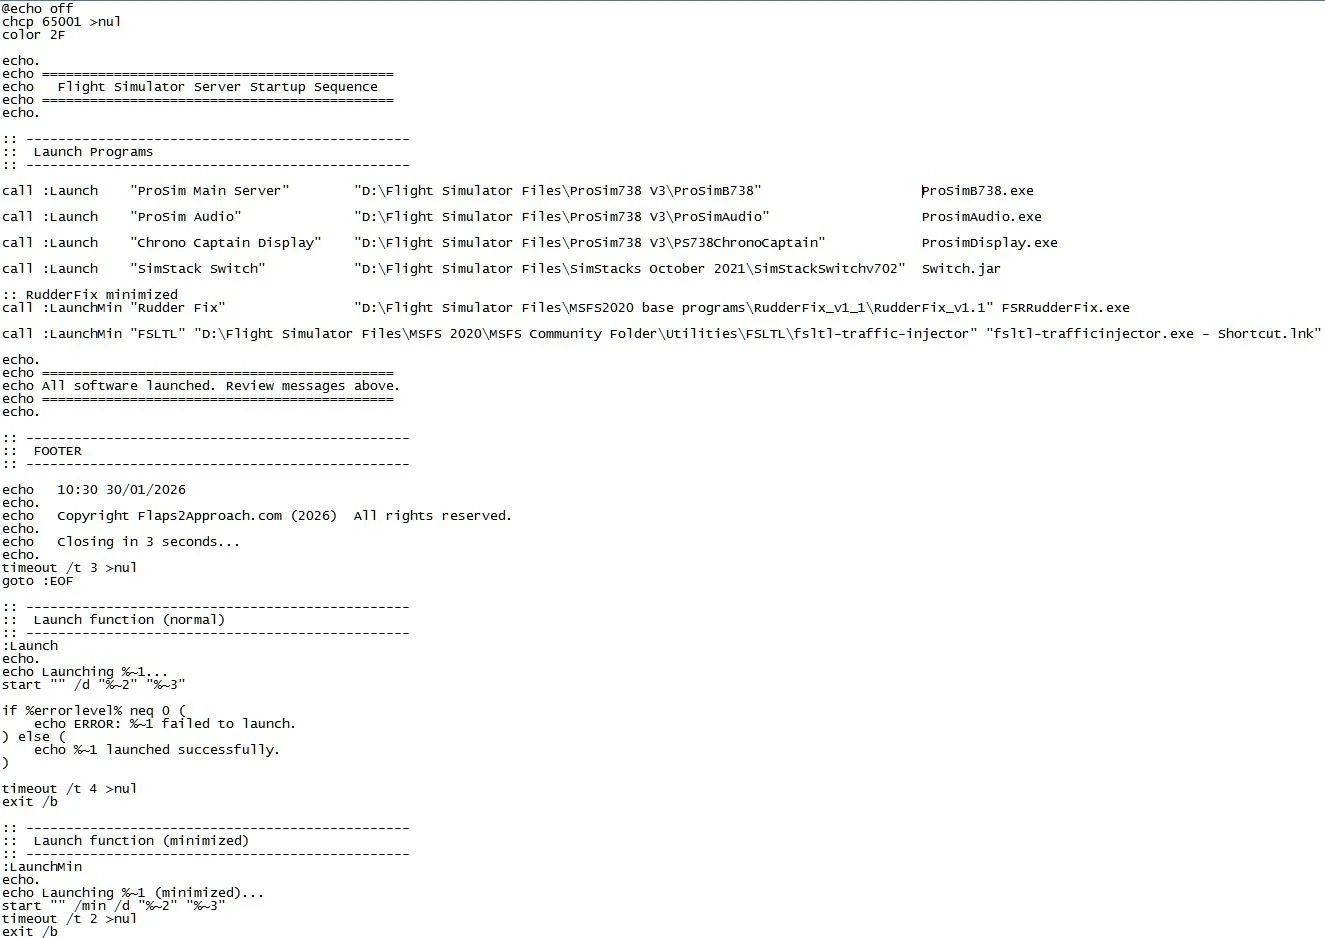
For example, a typical startup batch file used for a simulator session may:
Display a formatted header;
Launch multiple simulator-related applications;
Start programs from specific directories;
Display confirmation messages after each command;
Insert timed pauses between launches (timeouts);
Report success or failure of each operation;
Display timestamps or proprietary information; and
Automatically close the console window after a defined delay (to allow time to read the console display message).
The batch file may also configure the console display (the pop-up window that appears when it runs) by:
Disabling command echoing (@echo off): prevents commands from being displayed;
Setting UTF‑8 encoding (chcp 65001): enables support for additional special characters; and
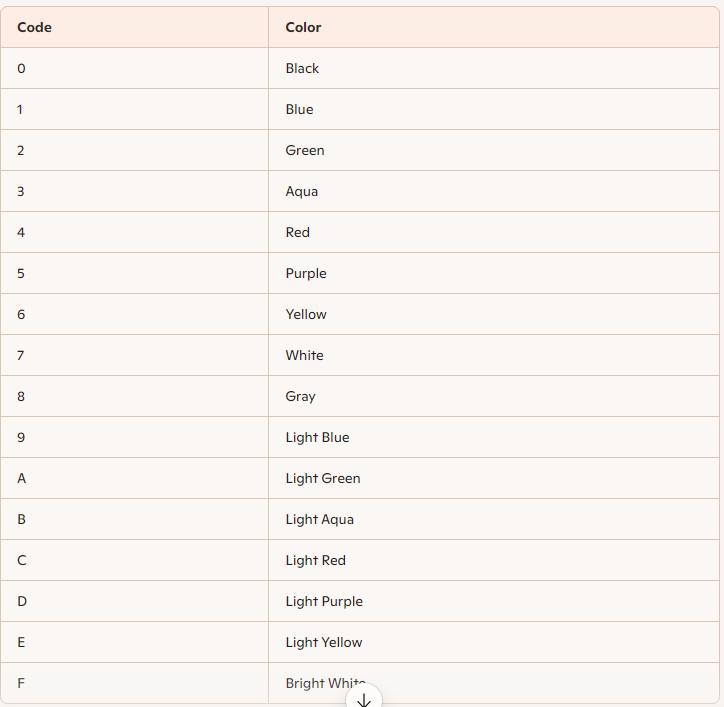
Applying custom console colors (color 2F): changes the text and background colors for improved readability.
While the advantages of a startup batch file are clear, a shutdown batch file is equally valuable. Both provide significant time savings and offer a convenient, one‑click method for opening or closing a flight simulator session.
Special Note - Shutting Down Active Sky
Active Sky requires a graceful, timed shutdown. Closing the program without allowing sufficient time can prevent it from shutting down correctly, which may cause it to fail to connect to its server the next time it is started.
If the batch file does not close Active Sky properly, it is recommended to close the program manually. This can be done either by clicking the X in the top-right corner of the window or by right-clicking the Active Sky icon in the Taskbar and selecting Close.
System Stability and Timeouts
Launching multiple programs simultaneously using a batch file can sometimes overload system resources or cause applications to initialise incorrectly, particularly when network connections must be established before proper operation. To prevent this, it is recommended to include a short pause between commands to allow for:
Completion of background processes;
Graceful initialisation of programs; and
Establishment of stable connections for network-dependent modules.
Most ProSim737 modules initialise quickly, and a one-second pause between each module is usually sufficient. However, some modules may require slightly longer delays if additional startup time is needed or if the computer is operating under limited resources. The ProSim737 main module typically takes the longest to initialise; however, a slight overlap during the startup of other modules rarely, if ever, causes issues.
When the main module runs on a server machine and the remaining modules run on a client machine, it should be allowed to fully initialise before starting any client-side modules. This ensures that all dependent components can connect cleanly and helps prevent unnecessary connection errors.
Important Point
Timeouts are strongly recommended in startup scripts. During shutdown, they are optional but still beneficial, as programs may require time to save data and close gracefully.
Creating a Batch File
Start Notepad.
Enter the file path and desired batch commands.
Save the file: choose Save As - All Files and apply the .bat extension.
Create a desktop shortcut if desired (the shortcut can also be pinned to the Taskbar).
Note: The batch file can be edited at any time by right-clicking the file and selecting Edit.
Because batch syntax is extensive, the most practical way to learn is to adapt an existing working script. Sample batch files are available for download in the file download section (Batch Files ProSim737 Advanced).
If you search the Internet, you will find several methods to create batch files of varying complexity. Often, there are multiple ways to accomplish the same task.
Important Point
Long file paths are easy to mistype. To copy a file path accurately:
Hold Shift and right-click the file; and
Select Copy As Path.
The copied path can then be pasted into Notepad along with the appropriate batch command.
Common Batch Commands
There are many batch commands that can be used. Table 1 outlines some of the more common commands used.
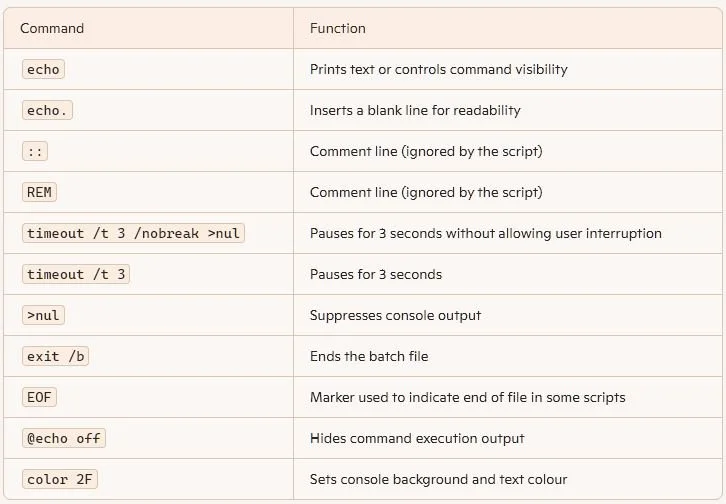
TABLE 1: Common batch file commands
My Preferences
I do not use a batch file to start Flight Simulator (MSFS 2020/2024) or Active Sky.
Flight Simulator can take considerable time to load, depending on connection speeds, and it is important that the software starts gracefully without competing processes. I manually start Active Sky from a taskbar shortcut after Flight Simulator is running and the aircraft is stable at the selected airport.
I do use batch files to start the ProSim737 main module and other ProSim components on both server and client computers. A corresponding closure batch file shuts down all programs on the server and client machines.
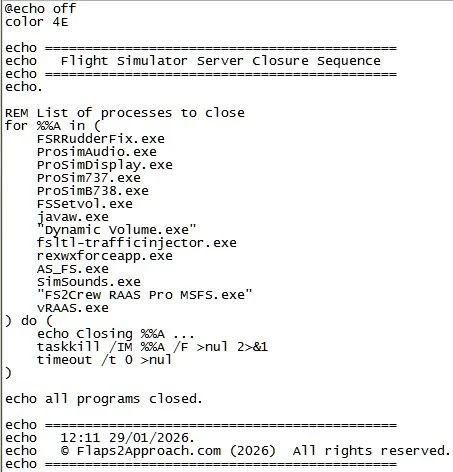
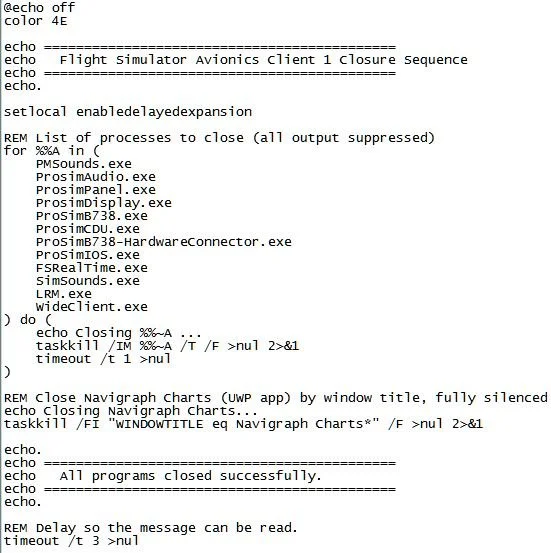
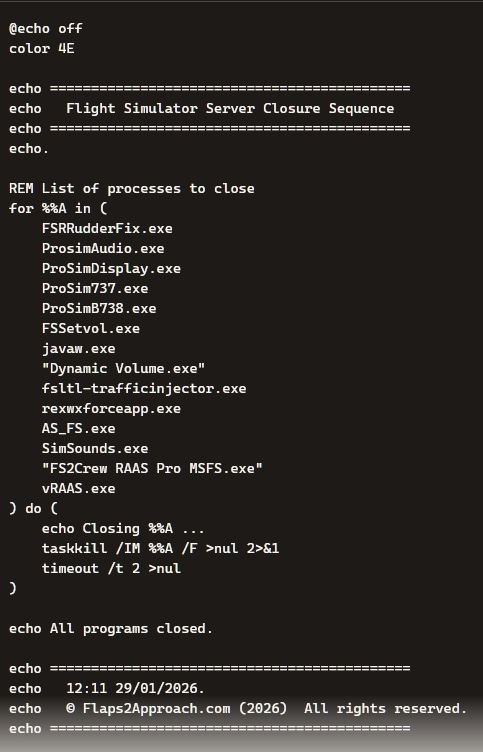
Sample Batch Files
In the sample closure batch file (see the gallery and download section), several programs are listed; some which may not be running when the batch file is executed. This is intentional, as different programs are often used during testing. In practice, executing a batch file that attempts to close programs not currently running has no effect - Windows simply ignores the command without causing any issues.
Troubleshooting Starting Sequence and Batch File Issues
Startup problems with ProSim737 are most often caused by connection issues between the ProSim737 main module and its associated modules. If errors occur during startup:
Allow sufficient time for the ProSim737 main module to start and initialise. Ensure the module connects to the server and fully initialises before starting any other modules.
If problems persist, especially after installing an update, the recommended approach is to:
Uninstall ProSim737 and reinstall the latest full (non-beta) release (including modules).
After confirming that version works correctly, you may then update to the latest beta if desired.
Important Point
Always back up your configuration files (such as the config.xml and cockpit.xml) before uninstalling. For more details, see: How To Update and Troubleshoot ProSim737.
Many startup problems can also related to batch files, particularly if you are unfamiliar with their syntax or directory paths. If a batch file does not function as expected, check that:
All directory paths are correct;
Commands are typed accurately; and
Appropriate delays (timeouts) are included between module launches (if required).
Additional Information
Final Call
Starting ProSim737 modules in the wrong sequence will not damage the software, but following a logical startup sequence and allowing each application time to initialise helps the system establish clean, reliable communication between modules - particularly the ProSim737 main module. By following this controlled startup approach, the likelihood of conflicts is reduced, background services have time to stabilise, and the environment for running Flight Simulator becomes more stable.
To help maintain this stable environment, batch files automate the sequence: they start and close each program in a consistent, methodical sequence, reinforcing the clean startup conditions the system relies on for stable inter‑module communication.
Gallery
Screenshots of batch file examples, batch file syntax colour table and common batch syntax commands.