White Caps for Locking Toggle Switches on Overhead
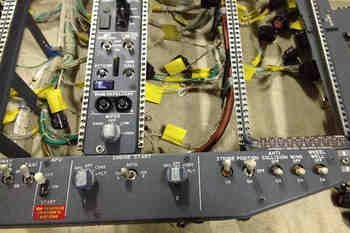
Lower electrical panel showing reproduction latex-style cap (ELEC 2) and OEM Honeywell Switch Accessory 15PA90-6W (ELEC 1). For those with keen eyes - yes that is a voice recorder in the lower panel - more to follow in later posts.  Of interest are the two different white caps (read main text)

It has taken a very long time to collect the assortment of OEM needed parts to complete the forward and aft overhead panels.  Finally the build is now in progress and it’s hoped completion will be towards the end of 2016.

OEM Overhead Panel Switches (2 main types)

There are two main types of switches used on the forward and aft overhead panel.  The push/throw switches (Honeywell switches pictured above) and the normal toggle-type switches.  The Honeywell switches use a screw on white cap while the standard toggle switches use use a condom style white cap.

Honeywell Switch Accessory 15PA90-6W showing internal screw thread.  The thread screws onto the stem of the toggle switch

Anatomy of the OEM White Cap

The Honeywell switch caps are not a slip-on latex cover but a solidly-produced head with an internal aluminium thread.  The head is designed to be screwed directly to the shaft of the toggle switches.  Firmly attached to this head is the white latex cap. This is the cap that is used on the push/throw switches. 

Reproductions

Most of the reproduction white caps for the push / throw switches are either push-on style condoms, or a white-capped head attached to a slender hollow shaft.  The shaft then slides over the existing switch stem. 

The reproduction slip-on caps currently available on the market bear little resemblance to those made by Honeywell.

Important Point:

  • Bear in mind that the push / throw switches are used regularly and are usually forcefully manipulated; many reproductions do not stand up to continued abuse.

Choice - so many options

I had purchased several dozen OEM Honeywell toggle switches, however, for whatever reason the white caps on the toggles were either missing or damaged.  Honeywell OEM switches are not inexpensive, so I was going to use reproduction white push-on caps (aka white condoms), but the caps failed to  fit snugly to the OEM switches, and their appearance was slightly different to the OEM version - the ends of the caps looked rather bulbous.

My next choice was to use latex caps that are used in automotive industry.  Once again, the appearance was slightly different and the automotive caps sported a small nipple at the end of each cap where they had been connected to the plastic retaining spur; I found the appearance of the nipple disconcerting.

Short of viable options, I purchased the OEM white caps from Honeywell which is the company that supplies Boeing.  If you carefully look at the above picture of the lower electrical panel (click image to enlarge picture), you will observe the nearest toggle switch has been fitted with an automotive style cap; the nipple and joining line is clearly visible.  The second toggle switch is fitted with the Honeywell white cap.

Installing the White Toggle Cap

To mount the white cap to a Honeywell switch you must first gently heat the switch stem.  The heat will loosen the head of the toggle.  It then is an easy matter to screw off the head and replace it with the OEM head.  To heat the stem use either a hair dryer or paint dry gun (used to dry paint).

Measurements

Not everyone wants to utilise OEM parts.  As such I have provided the measurements of the switch head (courtesy of Honeywell) for those who wish to try their hand at making their own white caps.

If you are searching for the other style of white caps used on the standard toggle switches, the part number for the correct condom white cap is 69-44578-2.

Reproduction Condoms - suppliers

For those not wishing to use OEM, there are several companies that manufacture reproduction white toggle caps.  For example, PC Flights and GLB United Kingdom.

Glossary

  • Honeywell – Avionics conglomerate that is heavily involved in the defense and aviation industries.

  • OEM – Original Equipment Manufacture.

Assembly of Forward Overhead Panel

Forward overhead using OEM parts

Construction of the simulator began in 2011.  It is now 2016 and I am perplexed to why the build has taken so long to complete.   Of course, opting to try and use OEM (Original Equipment Manufacture) parts whenever possible has added significant time to the project - especially the procurement of parts.

Most of the parts that make up the forward overhead have now been obtained and assembly of the components is well advanced.   Very soon the wiring from the panels to the Phidgets cards will begin.  This will be followed by several hours of testing to check correct functionality and to ensure perfect harmony between components and systems. 

A basic frame has been constructed to enable the overhead to be easily positioned to enable the wiring to be done with a little more ease.  After the forward overhead is completed, work on the aft overhead will commence.  Rome, it seems, was not built in a day.

Certainly, completion of the forward overhead will be the major project over the next few months.

Boeing Chart (Map) Lights - B737NG and Classic B737 Types

Chart lights removed from a Boeing 737-800 NG airframe.  Colour, appearance and design is different to the the older style lights used in the classic airframes

Chart lights (also called map lights) are attached adjacent to the overhead panel and are used to illuminate, in particular, the chart holders attached to the yoke during night time operations. There are two lights, one on the Captain-side and the other on the First Officer-side.

The light from the unit can be focused from a wide angle to a narrow beam by twisting the focus ring at the front of the light.  Each light can also be swiveled and moved vertically to position the light beam in a particular place on the flight deck (for example, chart plates).

The switches (knobs) that turn the light on and off are located on the sidewalls of the Captain and First Officer side of the flight deck.  The light can be dimmed if necessary by rotating the knob.

The chart lights are mounted near each the eyebrow windows.

Chart light removed from a Boeing 737-400 airframe.  The light has a differing focus ring, appearance and colour to the NG style (click to enlarge).  I believe this style of chart light is also used on the B747 aircraft

Two Styles (Classic and NG)

To my knowledge, there are two styles of chart light that have been used in the Boeing 737. The fatter style used in the classic series airframes and the more slender style used in the in the Next Generation airframes.  I have little doubt that there may also be small differences between light manufacturers.

The main aesthetic difference between the older 737 classic airframe chart lights and the newer Next Generation style is that the older lights are squatter and a little fatter in shape; the Next Generation is longer, more slender-looking and has a smaller footprint.

Chart light showing reflector dish on inner side of end cap.  This style is the older light type used in the 737 classic airframes

Other differences are internal and relate to how the light is focused on the lens and the physical shape of the focus rung used to alter the angle of light coverage.

Ingenious Design

Both style lights have an ingenious design to allow the light to be focused.   Removing the rear plate of from the older style light reveals the inner side to be a circular reflector dish (see image) which evenly distributes the throw of light when the unit is set to wide angle. 

The newer Next Generation style lights use an aperture blade which either enlarges or contracts as the focus ring is turned.  This design is identical to how a camera aperture works.

Both styles can use either a 12 or 28 Volt bulb; the later will generate a brighter light.  Connection is direct to the power supply (12 or 28 Volt).  An interface card is not required.

The NG style chart light.  A blade aperture controls the amount of light that is reflected onto the thick lens glass

Original Equipment Manufacturer (OEM)

Put bluntly, you cannot achieve a more realistic end product than when using a real aviation part.  Genuine parts, although at times difficult to find, are built to last; if they can withstand the continue abuse of pilots in a flight deck then they are more than adequate for home simulation use. 

It's true that while some parts appear used with faded and missing paint, they can easily be cleaned up with a fresh coat of paint.  Personally, I prefer the worn-appearance.

B737-800 NG EVAC Panel - A Nice-looking Panel

oem 737-800 evacuation panel (evac)

A quick post to showcase an OEM evacuation (EVAC) panel. The panel is usually mounted in the AFT overhead; however, as I am still developing the overhead panels I have temporarily installed it into the center pedestal.  

The EVAC panel’s use needs no introduction – it is triggered by the flight crew if and when evacuation of the aircraft is required / occurring.  A switch in the passenger cabin can be triggered by the cabin crew alerting the flight crew that an evacuation is imminent.  The panel is only used when on the ground (obviously).

The EVAC panel is from a 737-800 and the functionality includes: an arming/off switch, flashing red coloured EVAC annunciation, alarm cancelling pull knob, and a piecing alarm (horn). 

The panel is not connected to any function within Flight Simulator; therefore, an interface card is not required.  A continuity test, using a multimeter, is used to determine which pins in the Canon plug correspond to which switch/toggle/alarm.  The backlighting is powered by 5 Volts whilst the alarm and annunciator is 28 Volts.

Although the panel serves no true function in the simulator, it is a good-looking panel that improves the aesthetics of the center pedestal.  Once the overhead is fully developed the EVAC panel will be removed from the pedestal and placed in the aft overhead panel (the correct location).

The EVAC panel is an airline option.

Below is a video showing the panel’s use.


737-800 EVAC panel operation


Genuine B737 Forward & Aft Overhead Panels Purchased

For some time I’ve been debating whether to use a reproduction or OEM forward and aft overhead panel.  I have been favouring an OEM panel as this is in line with using genuine parts in the simulator, however, the overhead is a complicated piece of kit and ensuring complete functionality would be a challenge.

RIGHT:  Forward Overhead Panel.  The centre panels will be replaced to conform to a 737 Next Generation.  Panel was removed from a United Airlines 737-300 aircraft.

Certainly, using an overhead panel made by Flight Deck Solutions (FDS) is an easier option, however, despite their reproduction panels being high quality, there are discernible differences between reproduction and OEM panels.  

OEM 737 Overhead Panel Purchased

My decision was made for me when I was told a forward and aft overhead had become available from a recent 737 pull down.  Rather than remain indecisive, I thought I’d jump in “boots and all” and purchase it.  The two overhead panels have come from B737-300 and include the frames, DZUS rails, center panels, Cole engine starter switches, landing gear toggles and various other knobs and toggles.

I’m impressed at the condition of the panels; usually when panels are removed from an aircraft in a tear down yard there is little care given, and the frames become scratched, dented, or damaged in some way.  The frames I have purchased appear to be in relatively good condition.  

Cole Switches

I was fortunate that the two engine starter switches (Cole switches) were included.  These switches are made to exacting requirements and use a solenoid mechanism. 

LEFT:  Difficult to find operating Cole switches are used on all Boeing airframes from the 727 through to the Next Generation.

Purchasing Cole switches individually is quite expensive, so I'm pleased they were not striped from the overhead.

Panels and Backlighting

When I began to construct the simulator in mid 2011, I was adamant that backlighting should match that of the MIP, throttle quadrant and center pedestal.  I believe it was around 2006 that Boeing began to replace bulbs in favour of LEDS.  Certainly, the latest made Boeing uses LEDS. Therefore, my opinion has changed and I am happy to mix bulbs and LEDS (within reason)

The use of bulbs in the overhead uses a lot of power and generates considerable heat; using LEDS minimises power consumption and produces less heat.  If the LEDS are installed correctly, their resultant light is very similar to that of bulbs, and the brightness observed in the real aircraft.

Ultimately the back lighting will be dependent on whether I decide to use older style genuine Boeing panels or reproduction panels.

Realism & Authenticity - How Far Do You Go

Some flight deck builders go to extremes to ensure their flight decks replicate exactly what is seen in the real aircraf,t and while this is admirable, this is not the route I am 'religiously' going to travel.  There has to be compromise between replicating something exactly and having a functional flight simulator.

The end product will  be a combination of genuine (OEM) and reproduction parts - mostly OEM.

Furthermore, serious thought must also be given to how the overhead is going to be installed to the simulator; whether it be to a shell, such as produced by FDS or to a custom-made roll cage assembly.

I'll keep the Blog updated as parts are found and the overhead is developed.

  • Unfortunately I do not have any high quality pictures. These images were supplied by the vendor. Currently the overhead is still located in the US.  In time better quality images will be uploaded.

Landing Lights, But No Overhead - Go Flight Module

The 737 Project has been reasonably well mapped out and the work schedule revolves around specific aircraft systems. I try to finish work on one system (for example, the automation on the throttle) before moving to the next.

One of the provisos when I started this project was that I wanted the simulator to be working during construction. I was afraid that without using the simulator the project would loose traction.

The overhead is not scheduled for sometime (it is one of the last systems to completion).  In the interim, I am using the Sim Avionics virtual overhead, and moving a mouse around a screen is hardly realistic.

There are a number of switches on the forward overhead panel that can be easily mapped and configured to a toggle switch, and the switch mounted somewhere within the simulator.  Although unrealistic it is a better option than the mouse.

I have several GoFlight modules from my earlier simulator that were gathering dust; therefore, I decided to use two Go Flight T8 button modules to act as a interim overhead. I use the module to turn on and off the various lights - such as landing, taxi, navigation, collision and beacon.  The toggles also operate the anti-ice, CDU mode, seat belts, no smoking lights, yaw dampener and re-circulation fans.

The modules have been mounted into the center pedestal.  Although rather crude and certainly not realistic it works and fills the gap until the overhead is completed; making it easier to access the landing and a few other switches that are are used on every flight.

Boeing Style 737 Toggle Condoms

white condoms from glb england

Occasionally you come across a product which is a good idea, such as these small plastic push on toggles (flight condoms) that can be used to replicate the same style toggle used on the Beoing 737 aircarft.

Although many high-end companies already replicate these Boeing style toggle switches in their ICS overhead panels, there are many flight deck builders who either manufacturer their own panels or use other generic style toggles for various simulation purposes.

For instance, I’m not intending to replicate an overhead panel until near completion of the project.  As such, I’m using a number of standard GoFlight GF T8 switch panels/modules to mimic certain overhead functions.  These little push-ons can change the appearance of a GoFlight module from just a boring toggle to something that actually almost looks like a Boeing toggle switch.

GLB Flight Products produce two similar toggle cap lines.  One is the white toggle cap that pushes over an existing toggle.  The other is a complete sleeve replacement of your current assembly  with a new toggle sleeve and cap.  The new sleeve slides over a small diameter toggle switch and with a dab of super glue will stay there forever.

The sleeve toggles are not inexpensive. 

The toggle condoms and toggle sleeves can be purchased from GLB Flight Products.  I believe a similar product can also be found at Open Cockpit

Please note I have no affiliation with any company.  This journal entry is for information only.  Images are copyright to the respective company.